
Set Up Thermite's Reinforced-Wall Breach
On this page
Choose the reinforced wall your team needs before bringing Thermite into danger. The useful result is an opening your teammates can work from, not simply a destroyed panel. This guide covers Exothermic Charge on PC in Rainbow Six Siege X’s standard 5v5 rounds.
Agree on the wall and the follow-up
Thermite is an attacking hard breacher with the Exothermic Charge. Keeping him alive until the required breach and communicating with teammates are central to that support role. Thermite overview
Identify the wall, the view it should create and who plans to use that view. Ask what your team knows about the approach and the room beyond. If nobody is ready to help you reach the wall or watch the opening, resolve that before rushing ahead alone.
A nearby soft surface may offer a different useful opening. The Sledge guide explains that choice. Keep Thermite’s reinforced-wall job tied to the attack your team is actually making.
Resolve gadget denial before repeating a placement
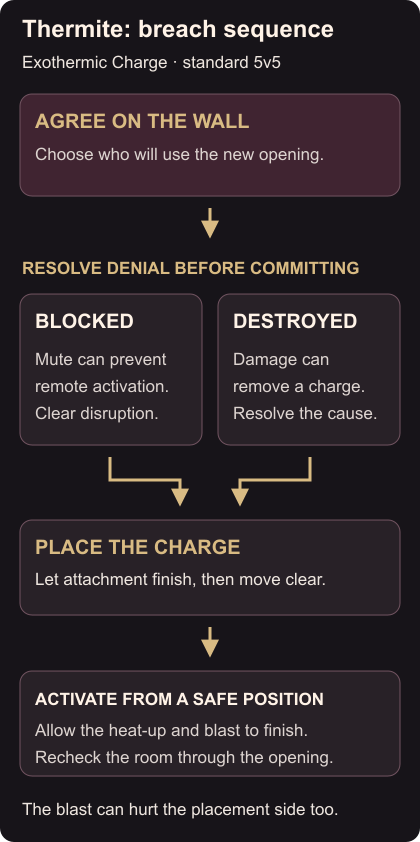
Exothermic Charges attach to destructible surfaces, including reinforced ones, and are activated remotely. Mute’s Signal Disruptor can prevent activation when the charge or Thermite is affected. Deployed charges can also be destroyed by damage, including electricity. Charge operation and denial
Treat those as different problems. A blocked activation does not mean the charge has been destroyed. If a placed charge is lost, repeating the same placement while the cause remains unresolved may lose another one.
When you see an electrified wall or encounter blocked activation, pause and coordinate with the teammate handling that obstruction. Check the wall’s condition again before committing. A call that someone is working on it is useful information, but it isn’t confirmation that the way is clear.
Place, retreat and activate
At the intended surface, attach the charge using your configured gadget controls and allow the placement to finish. Move to a protected position and make sure teammates are clear before triggering it remotely.
The charge has a delay between activation and the explosion. Its blast can hurt players on the placement side as well, so give the wall space and wait for the opening rather than standing beside the charge. Charge sequence
Once the wall opens, reassess the room. Defenders may have moved while you prepared the breach. Decide whether you should hold the new angle for another attacker or move with the team. Avoid walking through just because the hole is ready while everyone else is looking elsewhere.
The Rook armour guide covers part of the preparation defenders may complete before your attack. An open wall changes access; it doesn’t erase that preparation.
Rehearse the safe sequence
Arrange a quiet custom session with a willing partner who can reinforce a destructible wall. Choose your placement and retreat positions first. Rehearse one placement, move clear and activate, keeping your partner away from the blast.
Compare the view before and after from the position where you intended to attack. In a live round, review the earliest failure: reaching the wall, resolving denial or following up on the opening. Fix that step before changing the whole plan.